My Blogging Story


I've been blogging since January 2011. 

When I started, I was passionate about personal development and wanted to write about it over on www.elisemcdowell.com. I called it 'The Inner Vibrance Project' and I championed the core message of practicing self-love and having a healthy body image (which  by the way I still whole-heartedly practice)

But after a year I started to get burnt out. I was blogging almost every day, and although I had my topic, I didn't have a clear direction and I felt like I was running out of things to write about. Because how many times can you actually write "practice self-love" before you want to kill somebody?

The truth is, that's not what was really happening at all. On the surface, yes. But underneath? I was struggling with my upper limit problems. (Definition: An internal thermometer for how much success, wealth, happiness, love, and intimacy we’ll let ourselves experience. That’s our upper limit setting. Kind of like our success comfort zone.)

Because this is what was actually happening: My blog was growing traction, I had been marketing every single day, making new connections with other self-help bloggers, growing my brand and building a strong readership. My name was getting out there. I was selling affiliate products and had made several digital products including ebooks and e-courses, and they were selling like hot cakes (Mmmmm.. hot cakes). I was literally on my way to becoming a thought leader with a "business".

BUT, and it's a big one. I didn't know how to turn my blog into a business, I didn't know the next steps, and I felt guilty about the money I was making because it felt too easy.

And so I freaked out, sabotaged it all by getting sloppy, deleted a lot of my popular content, abandoned my readers and stopped blogging for TWO YEARS.

Because why not?

2012 to early 2014

During my two year break, even though I still felt stuck and unclear, I continued to study and read books on blogging and business, I invested in some blogging courses, continued to work on my own personal development and would read my favourite websites every day for inspiration and creative release

Lifestyle and DIY blogs became a huge guilty pleasure of mine, I'd always wanted to create one of my own. I actually did early on. It was called 'Pretty Delights', and it was soooooo homemade. I did the blog design myself, my photos were taken by an old camera and then heavily edited on PicMonkey for a "cool" sepia tone.

And to my surprise the damn blog started to gain followers! People started leaving more and more comments, asking for advice and sharing my posts. I was beside myself. And as it became more known, I again freaked out and completely abandoned it. I then eventually deleted it because I didn't believe it was good enough.

And I STILL couldn't see what I was doing to myself!

It wasn't until recently (this year) that I FINALLY connected the dots. That I was completely sabotaging my own success. And of course I was, I'd never known what true personal success was. I'd never made money on my own before. I'd never built something from scratch before. I'd never gained readers and followers who believed in my ideas before. I'd never built a business!

Yes,  I realized all of this even after I had started The Confetti Room.

*face palm*

So what do you do when you realize you've been cutting off your nose to spite your face (and nervous system)? You set up a fool-proof (or in this case, Elise-proof) plan to build a blog with the right foundation. Because giving up is NOT an option when you are passionate about it!
Because of all of that, I was able to do a lot of planning for The Confetti Room. I took into account all the mistakes I had made and all the things that had worked in the past and put it into my blog plan. I was able to get clear on the direction, the type of voice I wanted and my procedure for when I start freaking out and my upper limits start playing up.

And now? Things are going really good. The Confetti Room is growing slowly, but surely. If I start freaking out a little bit, I give myself a few days break and then come back in full force to pre-write and schedule several posts. I like how the blog is right now. I love the design (I am a recovering design changer) and I'm finally happy with the vibe the blog gives off. There's definitely always room for improvement, and I'll definitely be working on those things in the future.


So where to from here?

I've got big plans for the next few years. In June, I will be venturing deep into the Marlborough Sounds, pushing myself well out of my comfort zone through challenge in the outdoors with zero access to phones, computers, ipods, wifi or any form of technology (more on this later). When I return I will be returning with a purpose to focus heavily on building my personal development business (more on this later). Keyword: business.

I've found with any project I want to make successful, and rapidly, I literally have to pour 150% of my sweat, guts and energy into it. So The Confetti Room's content load may reduce significantly during this period.

But don't worry, there are bigger plans for TCR in the works. But for now, I'm keeping this space as a creative outlet solely focused on DIY while I build my business.

Next week I will be compiling a list of my best blogging tips for you to take away and use. Keep an eye out! And if you have any blogging questions you'd like me to answer, feel free to submit your question here.

But for now, what I'd really like to know from you is, what's your blogging story?


xo Elise

P.S - 25 ways to beat bloggers block

Two-Ingredient Homemade Tinted Lip Gloss (the easiest tutorial ever!)


Ready for the easiest homemade tinted lip gloss recipe of all time?

I bet you are!

Now, I'm not the biggest lip gloss fan. Having sensitive skin takes all the fun out of that. The only 'lip gloss' I tend to use is.. vaseline. 


I know right.

Vaseline has been my saving grace since I was a teenager. Between chapped lips at school in the winter to raw thighs from swimming in the sea, vaseline has always been my go-to fixer. And even to this day I still use it for a multitude of purposes, because it's cost effective, helps my sensitive skin and lasts foreverrr.

But sometimes, you want a little bit of colour. And for me that literally is, sometimes.


So I figured out a way to get said colour, without going all expensivey and staying homemade.


Two-Ingredient Homemade Tinted Lip Gloss


Ingredients

  • Lip gloss tub
  • Bowl
  • Mixing stick
  • Vaseline
  • Left over blush powder (organic is better)


Instructions

Place vaseline and power in bowl, mix until ingredients are smooth.


Did you think that was going to be harder? Think about how much money you'll save doing this!

You're welcome :-P


xo Elise

P.S - homemade body butter


Images via Free People

Sunday Reads #5: National Anthems, Anger Translators & Sweaters for Penguins


As I'm writing this, it has been raining non-stop since I woke this morning. I spent most of the day writing, but took a breather to venture into the woods with my Mum for a nature walk. Yes, in the rain. Because it's the best time to go. And now I'm back to writing again.

How has your Sunday been?

  1. It's not too late to start your #YearOfFirsts

  2. I literally kept myself up till 1am laughing in the dark about this finale to our national anthem

  3. Meet Obama's anger translator

  4. OMG - knitted sweaters for injured penguins!!!

  5. The most AMAZING brownie sundae recipe

  6. Taylor Swift's cover of Riptide by Vance Joy - LOVE this!

  7. The baddest thing I've seen all year. HOOOOWWWW?!?!?!

  8. British humour.

  9. Uptown funk workout!

  10. 10 times reporters asked women the wrong question.

  11. This cat is literally a child.

xo Elise

Chocolate Nutella & Strawberry Pavlova (warning: drool effect initiated)


Chocolate Nutella & Strawberry Pavlova

If you're a kiwi you obviously know what this is (which by the way DID ACTUALLY ORIGINATE FROM NEW ZEALAND, Australia).

Anyhoo, the only time I ever have pavlova is sadly at Christmas time. That and I'm not entirely a big meringue fan. The texture weirds me out a little bit. Is it soft? Is it crunchy? Is it sticky? Is it crumbly? I don't know.

But in saying that, you DEFINITELY want to try this nutella pavlova recipe. In fact it should be illegal not to. Get my drift? ;)


Chocolate Nutella & Strawberry Pavlova Recipe


Ingredients

  • 6 egg whites at room temperature
  • 1 cup of caster sugar
  • 3 tsp cocoa powder
  • 300ml cream
  • 1/2 cup Nutella
  • 1 punnet of strawberries

Instructions

  1. Heat oven to 150°C 
  2. Put some baking paper on two baking trays. 
  3. Beat the egg whites until they form soft peaks using an electric beater. 
  4. Slowly add 2 tablespoons of the sugar at a time, while beating on high. (make sure that the sugar has all dissolved in before adding the next lot).
  5. Add the cocoa and fold through with a spatula.
  6. Then spoon the mixture evenly onto the tray in a circle.
  7. Place tray in the oven for 1 to 1 1/2 hours or until golden and crisp.
  8. Leave to cool in the oven after cooked for 45 minutes for the best results.
  9. Beat cream with an electric mixer until fluffy.
  10. Pull meringue out of oven and transfer bottom layer onto a cake stand or plate.
  11. Spread half of the whipped cream over the bottom layer.
  12. On top of the cream add half of the nutella spread (to make runny, pop it in the microwave for 10 - 15 seconds).
  13. Chop strawberries and sprinkle on top.
  14. Repeat with second layer.
  15. And to finish, add a sprinkle of icing sugar with a sieve.

xo Elise

P.S - easy vanilla & berry chia pudding


Image via Love Swah

What Is Washi Tape Used For?


What Is Washi Tape Used For?

There's a lot of hype going around about the elusive "washi tape". But today I'm gonna answer the obvious..

"What is washi tape used for?"

Washi tape is literally decorative sticky tape. Originally it was used to give that extra touch of colour on gift wrapping. But now? We use it on EVERYTHING.

If you haven't used the 'mysterious' tape yet, I suggest you get yourself a set and experiment with it.

I love it because it's a simple way of expressing your personal style in your home or on your personal items and accessories - without taking a ridiculous amount of time to complete. It's the perfect item to craft with :)

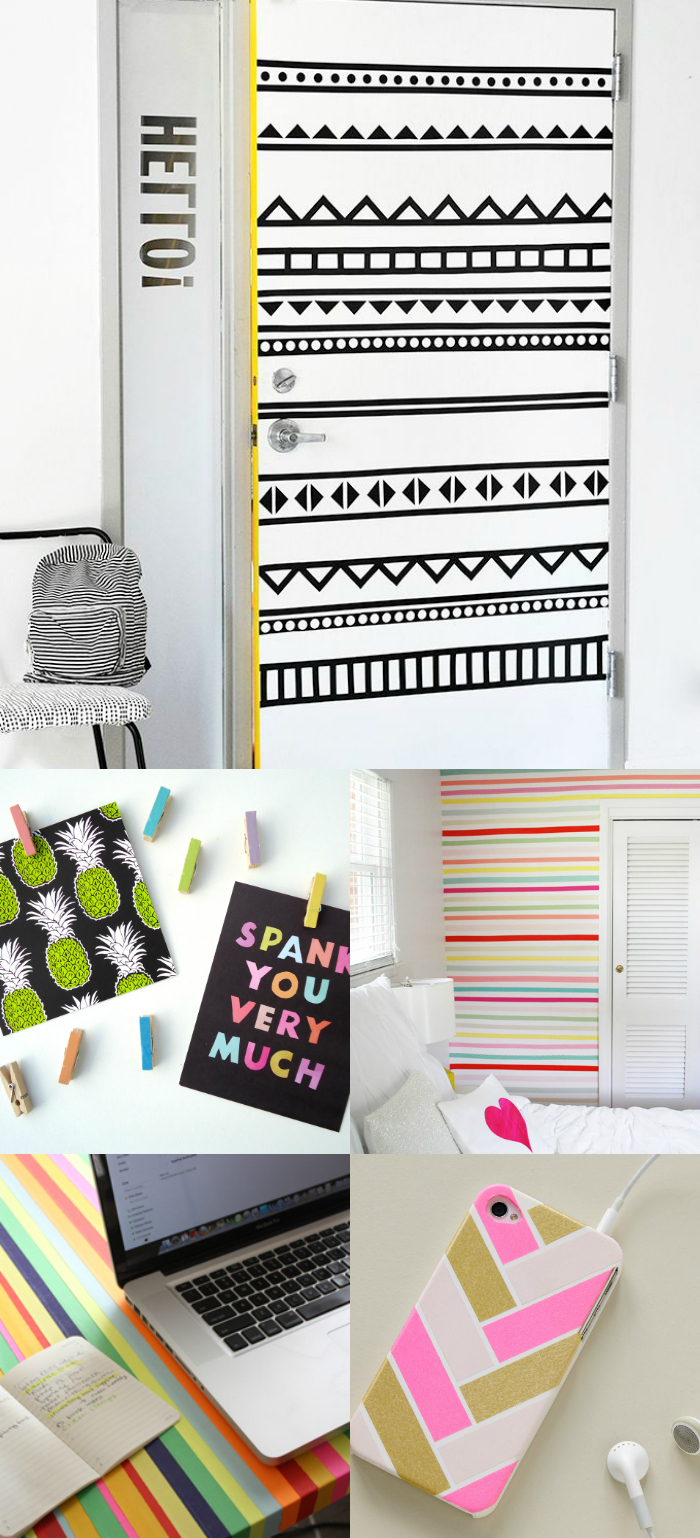
Below are 10 of my favourite washi tape examples:

  1. DIY Washi Tape Wooden Pegs

  2. Simple Washi Tape Ring Dish Tutorial

  3. Colourful Stripe Washi Taped Table

  4. DIY Washi Tape Wall

  5. Washi Tape Herringbone iPhone Cover

  6. Geometric Graphic Door DIY

  7. DIY Washi Tape Bookmark

  8. DIY Washi Tape Light Switch Cover

  9. Glitter Washi Tape Binder Covers

  10. Simple Washi Tape Greeting Card Tutorial

How do you like to use your washi tape?


xo Elise

Contact Form